A field proven guide to spec’ing the right skid steer trailer, doing the GVWR and payload math without headaches, loading and securing a wheeled or tracked machine so it passes inspection, and dialing in your tow vehicle and brake setup for predictable stops in all seasons. Use this as a standard you can hand to any crew and expect the same safe result every time.
How to think about transport before you buy?
Transport touches your schedule every single day. A smart trailer choice turns moves into muscle memory, not a mini project. Start with three truths. First, the right skid steer trailer is more than deck length and axle count. Deck height, approach angle, tie down locations, jack style, and ramp or tilt configuration change how fast and safely you can load. Second, legal weight and balance matter as much as raw capacity; if your numbers do not leave margin for attachments, fuel, and job boxes, you will overload something in peak season. Third, consistency beats cleverness. Pick a common deck height, common D ring spacing, and a common binder kit across your yard so every operator ties down the same way.
When people ask for the best trailer for skid steer, the right answer is the one that matches your machine weight with attachments, the roads you travel, and how you load at tight jobsites. A beavertail with stand up ramps is not automatically better than a tilt deck, and a deckover is not automatically better than an equipment trailer with fenders. The job decides.
Trailer types that fit common machines
Most skid steers with a bucket, forks, or a light attachment fit on a 14 to 20 foot equipment trailer with 7K to 10K axles, while compact track loaders with heavier forestry heads may demand gooseneck or pintle deckover frames. The trick is matching deck geometry and securement points to your routine so you can load quickly with safe sightlines.
Equipment trailer with fenders
Low deck height, easy climb, and common parts. Excellent for urban routes and residential driveways where approach angle and curb height make the difference between a clean load and a bumper scrape. Fenders can limit door opening on wide cabs, and D ring placement must be set so four point securement is natural, not a reach.
Deckover equipment trailer
Wheels under the deck add width and flat space for odd loads. Higher deck means a steeper angle with ramps but easier side loading for pallets or attachments. A good pick when you often carry attachments alongside the machine or need maximum usable deck width for wide rubber tracks and buckets.
Tilt deck trailer for skid steer
Hydraulic or gravity tilt gives a clean, ramp free load with a shallow angle when set up right. Fewer moving parts to handle in the dark and less chance of a ramp skid. On light machines, balance the tilt cylinder or deck pivot so the bed settles smoothly when the front idlers cross the pivot. A well tuned tilt deck trailer skid steer setup is the fastest solo load in town.
Beavertail trailer for skid steer
Fixed deck with a sloped rear and flip up or slide in ramps. The beavertail reduces the breakover and helps low clearance attachments avoid scraping. For crews that prefer a static deck and visible ramps, a beavertail trailer skid steer format offers predictable footing and lots of securement steel at the rear corners.
Gooseneck and pintle deckovers
When you haul a CTL with a mulcher, breaker, or planer and a pallet of parts, the gooseneck or heavy pintle deckover takes the pounding and moves tongue weight onto the truck correctly. The tradeoff is length and turning radius. For tight alleys and old neighborhoods, confirm your swing and curb cuts before you commit to a long neck.
Specialty and regional picks
In snow markets, heated storage for chains and a shovel locker add value. In forestry, heavy expanded metal in the beavertail keeps mud from turning ramps into ice rinks. In coastal markets, galvanizing and sealed wiring harnesses pay back in one winter.
Ramp geometry and traction
- Wide ramps with aggressive tread plate reduce spin for rubber tracks. Wood deck ramps are quiet but slick when wet.
- Spring assist matters more than anyone admits. Heavy, awkward ramps turn into shortcuts nobody loves, and that is how ankles get hurt.
- On tilt decks, add a removable cleat strip or grit surface at the pivot so tires do not slide when the balance point tips.
GVWR, payload, and tongue weight math without the headaches
You do not need to be an engineer to spec legal weight. You do need a repeatable method. Start with three numbers: empty trailer weight, actual machine weight with the attachment you most often haul, and the weight of add ons you routinely carry. Then leave 10 to 20 percent margin for wet ground, extra buckets, or an unexpected pallet of materials.
Core definitions that keep you honest
- GVWR for skid steer trailer is the total allowed loaded weight of the trailer. Never confuse axle rating with GVWR; the frame, coupler, and tires matter too.
- Payload is GVWR minus empty trailer weight. If you need a fast payload calculator in the field, write the empty weight on the tongue and keep a laminated card in the truck with your common machine weights.
- Tongue weight is the vertical load on the hitch. Aim for 10 to 15 percent on bumper pull and 20 plus percent on gooseneck for stable tracking. Too little tongue weight is sway. Too much is a sagging rear axle and light steering.
Example math you can copy
| Item | Weight | Notes |
|---|---|---|
| Trailer GVWR | 14,000 lb | Two 7K axles with brakes |
| Empty trailer | 3,200 lb | 18 ft equipment trailer |
| Available payload | 10,800 lb | GVWR minus empty |
| Skid steer with bucket | 8,200 lb | Full fuel |
| Forks and broom | 600 lb | Strapped on deck |
| Chains, binders, job box | 250 lb | Keep count honest |
| Loaded trailer | 12,250 lb | Under GVWR with margin |
Balance and axle share
- Place the machine so 10 to 15 percent of loaded weight sits on the tongue for bumper pull. Move the bucket forward or back to fine tune. Mark the deck with paint where your primary machine rides so every operator repeats the same spot.
- Check tire load ratings against real axle loads. Trailer tires must cover the axle rating, and the truck tires must cover tongue weight plus truck payload. If your numbers are tight, step up tire class, not just PSI.
- Level matters. A nose high trailer pulls like a parachute and overloads rear axles. Use an adjustable hitch to level the frame and keep your braking predictable.
If you struggle with numbers, ask your dealer to print a loaded scale ticket once. Tape it to the toolbox. Real weights remove guesswork and turn arguments into facts.
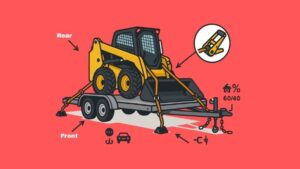
Securement that passes inspection every time
Inspectors care about method and math. Your job is to show obvious control of the load with a repeatable plan. The basics are simple. Use four point securement to the frame, keep angles shallow and balanced, and match your chain binder WLL to the job. If you switch between chains and straps, know which points are rated for which device and label them.
Hardware and WLL math in plain language
- Chains and binders must have stamped grade and Working Load Limit. Grade 70, 80, and 100 are common. Do not guess. The chain tag and binder stamp decide your math.
- Wheels and tracks are not frame points. Hook to welded D rings, factory tie eyes, or structural members designed for load. If you must cross a track frame, use softeners and avoid sharp edges.
- The total WLL of your securement in the forward direction must meet or exceed a percentage of the load per applicable rules. The clean way to meet this is four equal chains from four corners, each at 30 to 45 degrees, each with a WLL that makes the math comfortable. When in doubt, add capacity rather than running on the razor’s edge.
How to tie down a skid steer without drama?
- Park on the deck in your marked spot with the heaviest attachment facing forward unless balance demands the opposite.
- Lower the bucket or attachment to the deck and relieve auxiliary pressure so couplers are at rest.
- Set park brake, drop the arm bar or lock, and place any manufacturer arm stops if required.
- Attach front left chain to a front frame point, then front right. Take slack with the binder but do not over tighten yet.
- Attach rear left, then rear right to rear frame points. As you tighten each binder, watch the machine settle evenly without walking. Recheck the first set and re tension evenly.
- Secure any loose chain tails, lock binders with safety pins or clips, and add a separate strap or chain for the attachment if required by your policy or local rules.
Straps, edge guards, and DOT securement expectations
- Straps are excellent for buckets, forks, and light attachments but are not a primary restraint for the machine. Use protective sleeves over edges and keep straps off abrasive corners.
- DOT securement checks live or die on obvious control. Clean, undamaged chains and visible binder locks make inspections short. Rusty, mismatched hardware makes them long.
- Binder style is operator preference. Ratchet binders are slower but safer for mixed crews. Lever binders are fast but demand training and cheater bar rules. Whatever you choose, write a one page policy and train to it.
Secure your attachments like separate loads. Forks should be locked or strapped. Brooms should be blocked. Buckets should not be free to bounce. If you can nudge it by hand, an hour of highway wind will move it.
Protecting hoses, couplers, and cabs during transport
Most transport damage is small and cumulative. A pinched hose rubs for a month, then bursts on a Friday. A door latch that almost closes pops open on the highway. Put tiny habits in place and those problems disappear.
- Hose protection transport starts with sleeves and caps. Cap every flat face coupler. Sleeve any hose that rubs the quick attach frame when the bucket is down for travel.
- Route and tie whip hoses so they cannot flap in slipstream. Use short Velcro wraps that live on the couplers so they never get lost.
- Cab door latch transport checks are a daily ritual. Close and tug. If the door has play, adjust hinges and latch now, not next week. Add a secondary transport clip on poly doors if your routes are rough.
- Remove loose pins and store them in a magnetic tray in the truck box. A missing lynch pin can become a missing bucket when you hit a pothole.
- Fold or pin auxiliary stands on attachments before you strap. A single support leg can saw through a strap over a long ride.
Tow vehicle brakes and controller settings
Braking wins or loses the day. Power helps you merge. Brakes keep you out of headlines. A proper electric brake controller paired with good trailer brakes, a healthy breakaway kit trailer circuit, and smart gain settings turns a heavy move into a calm one.
Controllers that behave the way you expect
- Integrated proportional controllers in modern trucks read deceleration and apply trailer brakes in sync with the truck. Aftermarket proportional units do the same if installed cleanly. Time based controllers delay and ramp in and feel vague at low speed. Prefer proportional for heavy equipment.
- Brake balance setup matters more than raw gain. On dry pavement with a loaded trailer, set gain so the trailer contributes without grabbing. On gravel, reduce gain so trailer tires do not lock and push the truck sideways.
- Use manual slide to test before you roll. The trailer should slow you without drama when you apply trailer only. If it yanks or does nothing, adjust gain or inspect wiring and magnets.
Breakaway and wiring sanity
- Test the breakaway kit trailer function monthly. Pull the pin with the jack down and confirm the brakes hold. Replace the battery when it fails a test or at scheduled intervals. Label the date on the case.
- Use a sealed 7 way connector and inspect for green corrosion. Poor grounds make strong brakes feel weak and cause random controller faults on bumpy roads.
- Carry fuses and a spare 7 way. Electrical gremlins love rain and salt. A five minute swap beats an hour of tracing wires in a storm.
Truck setup beyond the controller
- Match hitch class to tongue weight. Adjustable hitches let you keep the trailer level as loads change. For heavy goosenecks, verify bed and frame mounts are torqued to spec.
- Use tow haul modes that hold gears and increase engine braking. If you have an exhaust brake, use it on long grades to save service brakes.
- Mirror extensions and clean backup cameras reduce blind spots at fuel stops and tight sites. Set them the same way in every truck so handoffs are painless.
Loading workflow and site logistics
Loads are fastest when you remove decisions. Every step is the same regardless of weather, machine, or driver. If something breaks, stop the sequence and fix it. Do not improvise your way into an injury.
Standard loading sequence
- Park on level ground, chock trailer wheels, set truck in park with brake set, and drop landing gear if needed.
- Inspect deck for ice, mud, and loose parts. Sweep or salt as required. A clean deck is a safe deck.
- Deploy ramps or unlock the tilt. Confirm locks and pins are out of the way and the path is clear.
- Mount the machine, test service brake, and approach slowly in low range, square to the deck. No diagonal climbs. Maintain steady throttle so tracks or tires do not jerk at the hinge point.
- Stop in the marked position, lower attachment to deck, relieve auxiliary pressure, set park brake, and place any mechanical locks required by the manufacturer.
- Shut down if your securement policy requires it, then install chains and binders in the same corner order every time. Tie the attachment separately if your policy requires it.
- Walk around to check for rubs, slack, or missing pins. Stow ramps or lock the tilt and remove chocks last.
Unloading habits that prevent roll offs
- Chock wheels first, set brake, and break binder tension carefully. Release opposite corners in pairs so the machine stays centered.
- Open the tilt or drop ramps only after chains are clear. Look for pedestrians and traffic. Communicate with a spotter when backing down.
- Pause at the pivot to let the tilt settle before the machine’s center of gravity tips over the hinge. Sudden drops scare operators into jerky inputs.
If you load on crowned or sloped roads, position the trailer so the deck is level across width. A small side slope becomes a big lean when the bucket crosses the pivot.
Pre trip and post trip checklists
Pre trip
- Confirm chains, binders, and straps are present, tagged, and undamaged. Replace bent hooks and dogged threads.
- Check tire pressures on truck and trailer. Low pressures eat tires and raise temperatures on summer trips.
- Test lights, electric brake controller output, and breakaway battery status. Carry a spare 7 way.
- Verify registration, insurance, and inspection dates on plates and in the cab binder.
- Walk the load area for overhead lines and tight turns. Plan your exit before you commit the truck.
Mid route
- Stop after ten miles to re tension chains. Steel and deck flex settle. Mark binder handles so you can see movement.
- Feel hubs and couplers by hand. A hot hub or connector needs attention before it melts something more expensive.
Post trip
- Inspect chain wear points and add sleeves where paint burnishes. Replace straps with cuts or melted fibers.
- Clean the deck. Mud hides nails and bolts that slice tires tomorrow morning.
- Log any equipment issues and schedule fixes before the next move. Transport equipment deserves the same discipline as the machines it carries.
FAQ
How to transport a skid steer?
A skid steer is typically moved on a properly rated equipment trailer or tilt-deck truck, with the machine loaded low, centered over the axles and parking brake engaged. Use chains or heavy-duty straps on the manufacturer’s tie-down points, secure the attachment, add secondary safety checks, and always stay within the trailer’s weight rating and local transport regulations.
How much does it cost to transport a skid steer?
Skid steer transport is usually priced by distance and size, but most short hauls fall roughly in the 2 to 4 dollars per mile range, with minimum trip charges often applying. Long-distance or oversized moves, tight schedules, or special loading conditions can push the price higher, so it is smart to get a written quote based on your exact route, machine weight and timing.
What size truck to transport skid steer?
For most compact and mid-size skid steers, a three-quarter-ton or one-ton pickup paired with a 10,000–14,000 lb rated equipment trailer is the standard setup. Larger or heavier machines may require a medium-duty truck and higher capacity trailer, so always compare the skid steer’s operating weight plus attachments to the combined truck and trailer GVWR.
What size trailer is the best trailer for skid steer if I run a bucket and forks most days?
A 16 to 18 foot equipment trailer with 10K axles often covers a mid frame wheeled loader plus forks and a small broom, provided your weights leave margin. If you routinely add a heavy planer or mulcher, step up to 14K or a deckover gooseneck with more payload so the math stays comfortable.
Should I pick a tilt deck trailer skid steer setup or a beavertail with ramps?
Tilt is faster and safer for solo operators who load daily in tight spaces. Beavertail suits crews that prefer visible, grippy ramps and need extra steel at the rear for tie downs. If your lots are icy in winter, tilt with a textured pivot zone and a hydraulic lock makes life easier.
How do I estimate GVWR for skid steer trailer without overthinking it?
Add the real loaded machine weight, attachment weight, and the weight of chains and boxes, then add at least ten percent margin. Pick a trailer with that payload and tires that cover the axle rating. Level the trailer and verify tongue weight lands in the right window for stability.
What tongue weight should I aim for on a bumper pull when I carry a CTL?
Aim for 10 to 15 percent of total trailer weight on the tongue. Use a scale or a tongue weight gauge during setup. If sway shows up, move the machine forward in small steps and recheck level. Too much tongue weight overloads the rear axle and hurts steering.
What is the simplest way to tie down a skid steer so I pass a roadside check?
Use four point securement to frame rated points with chains and ratchet binders. Lock binder handles, secure tails, and strap the attachment separately. Clean hardware and visible tags shorten inspections compared to rusty, mismatched gear.
Do I need to worry about chain binder WLL math if I use Grade 70 across the board?
Yes. Grade is not the only number that matters. Working Load Limit varies by size and device. Sum your forward restraint capacity and make sure it meets or exceeds the required percentage of load. When in doubt, go up a size or add a fifth restraint for margin.
Why are my hoses scuffed after every long haul even though I cap couplers?
Caps protect against dirt, not abrasion. Add sleeves and tie whips short so they do not flap. Check the quick attach frame for a sharp edge where the bucket rests and add edge guard if needed.
How often should I test the breakaway kit trailer battery?
Monthly during the season and before any long trip. Pull the pin with the jack down and confirm the brakes hold. Replace the battery on failure or at scheduled intervals and mark the date.
What electric brake controller settings work best in rain and snow?
Reduce gain slightly from your dry pavement setting and rely on proportional control so the trailer tracks, not locks. Use manual slide to test in a safe area after you set gain. If the trailer grabs or skates, back off and retest.
Why does my trailer feel pushy even though the brakes test fine at the yard?
Brake balance setup may be off under load, or the controller is time based and lagging at low speed. Confirm proportional control, re level the trailer, recheck tongue weight, and inspect grounds. Weak grounds mimic weak brakes.